Arming Extraction Rocket
100045-01
Use the following tasks to arm the extraction rocket.
Applicable Aircraft Serial Numbers
All
Type of Maintenance
Line
Level of Certification
LSA-RM
Task Specific Training Required
No
Special Tools Required
None
Parts Required
04035-01 (Screw, 10-24 x 5/8” S.S.)
04055-01 (Washer, Ext. Tooth, #10 S.S)
017004-01 (Screw, 10-24 x 3/8” PH)
005033-01 (Plug, Non-Threaded, 1/2”)
Aircraft System and Number
16—ICON Parachute System (IPS)
Safety Equipment
As Needed
Consumables
LOCTITE®242
Warning:
Contact ICON Support before beginning maintenance.
Task Instructions
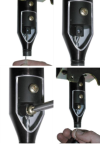
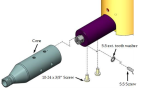
1. Thread activation cable end loop through the cone and insert the loop into the slot on the end of the actuator. Put a drop of LOCTITE Blue 242 threadlocker on the threads of 10-24 stainless steel screw. Install screw through the unthreaded end of the actuator first, with exterior tooth star washer into hole and through loop in cable. The torque value for this screw is 1.8 lb-ft.
Figure 504. Threading Activation Cable Loop
2. Ensure that the screw is tightened with a torque of 1.8 lb-ft, through the unthreaded side before completing this step. Assure screw is through the activation cable loop by checking security with a VERY light finger-tip pull (<1/2 pound force) on cable before reinstalling cone.
Figure 505. Checking Cable Loop Security
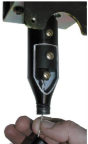
Warning:
Pulling too hard can cause the extraction rocket to fire.
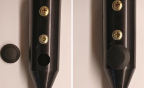
Grasp the launch tube cone, secure it with (2) two screws, 10-24 x 3/8” PH, with a drop of LOCTITE Blue 242 threadlocker. A torque value of 1.5 lb-ft should be used to tighten this screw. Ensure mating threads are clean, free of debris and not cross threaded.
Figure 506. Reinstallation of Launch Tube Cone
4. Insert non-threaded plug into access hole to protect it from the elements.
Figure 507. Access Hole Plug
Verification Method
The procedure is complete when the rocket has been successfully armed and all components are secure.
Parent topic