ELT Audio Alert Indicator Battery Replacement
100047-00
The following instructions detail how to replace the audio annunciator battery.
Applicable Aircraft Serial Numbers
All
Type of Maintenance
Line
Level of Certification
LSA-RM
Task Specific Training Required
No
Special Tools Required
None
Parts Required
Duracell CR-2,3 or equivalent
Aircraft System and Number
10—Instruments (and Avionics)
Safety Equipment
As Needed
Consumables
None
Note:
The ELT audio alert indicator’s battery must be replaced every 10 years.
Task Instructions
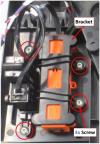
2. Locate the ELT remote control panel.
3. Use a T10 Torx driver to remove the four 6-32 screws attaching the black ICA009273 Bracket to the orange audio alert indicator and RCPI.
4. Remove the four retaining screws which secure the top cover to the audio alert indicator P/N E-04.7
5. Carefully remove the top of the indicator exposing the battery compartment.
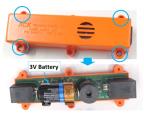
6. Install a Duracell CR-2,3 or equivalent battery. Make sure to observe the battery polarity.
7. Replace the top cover, making sure the grill portion of the indicator cover is positioned over the buzzer.
8. Mount the audio alert indicator and RCPI back into the overhead console, securing them with the ICA009273 Bracket and four screws.
9. Replace the overhead console mount.
10. Replace the overhead console bezel.
11. Enter the audio indicator’s battery expiration date in the aircraft airframe log book.
Verification Method
After battery replacement, perform the ELT battery self test per ELT Battery
Self Test.
Note:
The ELT Remote Battery should be checked and replaced at the same time.
Parent topic