Connect Static Line
100105-01
Use the following to connect the Static Line with the aircraft.
Applicable Aircraft Serial Numbers
00139+
Type of Maintenance
Line
Level of Certification
LSA-RM
Task Specific Training Required
No
Special Tools Required
None
Parts Required
4x ICA011589 (PUSH-ON TEE CONNECTOR)
Aircraft System and Number
10—Instruments (and Avionics)
Safety Equipment
As Needed
Consumables
Cable Tie
Task Instructions
1. Locate precut 11.5” piece of tubing with STATIC label. Install the labeled end into the aircraft LH port of the airspeed indicator.
2. Install the opposite end of the tube into the straight port of the tee connector.
3. Secure STATIC tubing to previously installed PITOT tubing using cable tie.
4. Secure tee connector to previously installed PITOT tee connector and main wire harness using cable tie.
Figure 259. Static Line
Note:
Loosely install the cable tie. The cable tie will be secured at a later step. This cable tie will be used to route and secure the STATIC and AOA lines as well.
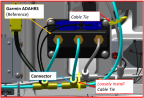
5. Locate 2x precut 5.5” pieces of tubing with STATIC labels. Install the labeled end into the open ports of the GARMIN ADAHRS.
6. Connect center 5.5” tube into top port of previously installed tee connector.
7. Locate precut 1.75” piece of tubing.
8. Install into push on tee previously installed.
9. Connect 1 push on tee connector to another end of tubing.
10. Connect remaining 5.5” tube into top port of tee connector.
Figure 260. Static Line
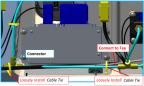
11. Locate precut 8.5” piece of tubing. Install one end into the open port of the previously installed tee connector.
12. Connect opposite end of tube to 1x push on tee connector.
13. Loosely secure STATIC tube, PITOT tube, and wire harness using 1x cable tie within 1” of cable tie block.
14. Loosely secure tee connector to main wire harness, and PITOT tube using 1x cable tie as shown.
Note:
Loosely install the cable ties. The cable tie will be secure at a later step. These cable ties will be used to route and secure the STATIC and AOA lines as well.
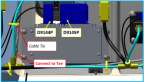
15. Locate precut 11.5” piece of tubing with STATIC label. Install the labeled end into the port on the altimeter.
16. Install the opposite end of the tube into the top port of the previously installed tee connector.
17. Secure STATIC tubing to D9144P and D9145P wires using 1x cable tie in the location shown.
Figure 261. Static Line
18. Locate precut 15.5” piece of tubing and install into open port on previously installed tee connector as shown.
19. Route tube along crossbeams as shown.
20. Loosely secure STATIC tube to wire harness and PITOT tube using 2x cable ties. Cable ties to be withing 1” of existing cable tie mounts.
Figure 262. Static Line
21. Install 1 tee connector onto opposite end of 15.5” tube as shown.
22. Locate precut 5.5” piece of tubing with STATIC label. Install the labeled end into the PS port of the MSC.
23. Install the opposite end of the tube into the top port of the tee connector as shown.
24. Loosely secure tee connector to wire harness and PITOT lines using 1x cable tie as shown.
25. Identify the static line (bundled with wire harness, routed inside fuselage on RH side of aircraft). Route and cut the tubing to the static push-on tee connector, ensuring the there is enough length to be routed through the first two tie mounts.
26. Secure static line to wire harness using 1x cable tie within 1” of existing cable tie mount.
Figure 263. Static Line

Verification Method
Verify there are no instances of wire chafing and that wire protection is applied in the appropriate locations.
Verify all connectors have good connections and adequate strain relief.
Verify zip ties are tightened properly, adequately holding wire harness in place and preventing movement without visible signs of bending or cutting wire insulation/sleeving or pinching pitot/static lines.
Perform PITOT Static leak check. Pitot-Static-AOA
Leak Test Procedures
Parent topic