Remove Flap Actuator
100170-00
Use these instructions to remove the flap actuator.
Applicable Aircraft Serial Numbers
All
Type of Maintenance
Line
Level of Certification
LSA-RM
Task Specific Training Required
No
Special Tools Required
None
Parts Required
None
Aircraft System and Number
06—Flight Controls
Safety Equipment
As Needed
Consumables
None
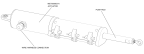
Figure 124. Flap Actuator Diagram
Task Instructions
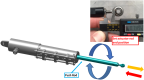
2. Set actuator rod end position as shown. Be sure that the rod end is clocked in a way so that it will sit in the flap bellcrank properly. Torque jam nut to 50-70 in-lbs.
Figure 125. Set Actuator Rod End Position
3. Disconnect the flap actuator from its wire harness.
4. Disconnect the flap actuator from the flap bellcrank by removing the AN4C10A bolt that fastens them together. Retain hardware for reinstallation. (Removal
and Installation of Inspection Panels and Fairings)
Figure 126. Remove Flap Actuator
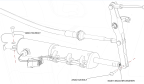
5. Disconnect the flap actuator from the flap actuator bracket by removing the AN4C10A bolt that fastens them together. Retain hardware for reinstallation.
6. Remove flap actuator.
Verification Method
This task is considered complete when the flap actuator has been removed.
Parent topic