Horizontal Tail Tip Pin
100261-00
Removing and replacing the horizontal tail tip pins.
Applicable Aircraft Serial Numbers
All
Type of Maintenance
Line
Level of Certification
LSA-RM
Task Specific Training Required
No
Special Tools Required
None
Parts Required
None
Aircraft System and Number
09—Horizontal Tail
Safety Equipment
As Needed
Consumables
LOCTITE® 220™
Task Instructions
1. Pull downward on the tip lock latch to remove it from the detent position and rotate the latch approximately 180°.
Figure 208. Tip Lock Latch

2. Grasp the tip and slide it away from main horizontal tail until the cylindrical spar clears the structure.
3. Support the horizontal tail tip on a soft protective surface.
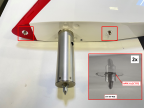
4. Two retaining pins protrude from the surface of the tip’s root rib. Each pin has flats to engage a 1/8 in open-end wrench. Remove a pin using a wrench to rotate the pin as one would a bolt or stud. Ensure that the wrench fits securely and turn the pin carefully to avoid rounding off the flats.
5. Install the new pin by screwing it in first by hand to ensure that the threads are engaging properly, then torque to 5-10 in-lbf. If this torque is insufficient to fully engage the pin, remove it, clean the threads and reinstall.
6. Apply LOCITITE© 220™ to the base of the new pin after torquing. This is a wicking type of LOCITITE© and it will be drawn into the threads. Wipe off any excess.
Figure 209. LOCTITE Application
Verification Method
After pin replacement, install the tip on the horizontal tail and verify correct fit and that the secure wing/tail light on the pilot’s annunciator panel indicates correctly.
Parent topic