Install Roll Trim Tab
100365-00
Use these instructions to install the roll trim tab on the aileron after the correct length has been determined.
Applicable Aircraft Serial Numbers
All
Type of Maintenance
Line
Level of Certification
LSA-RM
Task Specific Training Required
No
Special Tools Required
None
Parts Required
Roll trim tab stock, 90505, 24”
70006738424; 3M VHB Tape 5915WF White, 1/2 in, 16 mil
Aircraft System and Number
06—Flight Controls
Safety Equipment
As Needed
Consumables
None
Task Instructions
1. Cut the trim stock to the desired length and record length in the aircraft logbook. (Remove Roll Trim Tab)
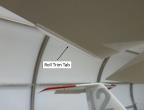
2. The tab is a plastic extruded angle with equal length legs. One leg is adhered to the aileron. The other leg of the tab hangs down beneath the surface of the aileron, flush with its trailing edge and also flush with the inboard end of the aileron (the open face of the angle faces down and forward when installed). Peel off the protective film from one side of the VHB tape and stick it to one leg of the tab.
Figure 105. Right Aileron Shown
3. Trim the tape flush with the edges of the footprint of the tab.
4. Trim both ends of the leg of the tab without tape off at a 45° angle as viewed looking towards aircraft forward with tab installed.
5. Stick the tab to bottom of the aileron that is opposite to the direction the aircraft rolls. For example, if the airplane without a tab tends to roll to the right, the tab should be added to the bottom of the left aileron. Align the tab as noted above and stick it down with firm pressure along its length.
Verification Method
After the tape is fully cured, pull firmly on the component to ensure that it is bonded properly to the attaching surface.
Parent topic