Main Landing Gear (MLG) Bumper Stop Replacement
100720-00
Use the following procedure to replace the MLG Bumper Stop.
Applicable Aircraft Serial Numbers
All
Type of Maintenance
Line
Level of Certification
LSA-RM
Task Specific Training Required
No
Special Tools Required
None
Parts Required
2X 9540k872 (BUMPER RUBBER, .812X.50)
or
2X (as required) ICA011866 (BUMPER, RECESSED, FLAT TOP, .750DX.75H)(longer)
Aircraft System and Number
11—Landing Gear
Safety Equipment
As Needed
Consumables
SIL-POXY (ADHESIVE, SILCONE RUBBER, SMOOTH-ON)
TT-I-735A or equivalent (ISOPROPYL ALCOHOL)
200 Grit Sandpaper
Masking Tape
Task Instructions
1. Mark the location of the partially disbonded bump stop or the location of the bump stop adhesive residue if the bump stop is no longer present.
2. Remove bump stop if partially disbonded.
3. Remove any residual adhesive from both the bump stop and the lower seawing skin.
Note:
Substitute longer bumper (PN: ICA011866) as needed if one gear leg contacts bumper before the other during retraction.
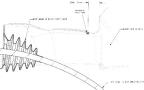
4. Locate the rubber bump stop 9540K872 (ICA011866) as marked in Step 1, mask the area and prep the surface of the bonding area by scuffing with 200 grit sandpaper, clean both the rubber bump stops and the lower sea wing skin with Isopropyl alcohol prior to bonding.
Figure 326. Bumper
5. Bond the rubber bumper to the lower sea wing skin with SIL-POXY adhesive, allow to cure for 1 hour.
Verification Method
Swing the landing gear system to ensure the proper rigging with .005” gap on the right MLG from the bump stop per Main
Landing Gear (MLG) Rigging and Rigging Check with Landing Gear Up. Light contact can occur but a piece of printer paper should be able to be slid out of between the gear leg and the bump stop without tearing. During the swing ensure the fuses don’t trip. If the MLG rigging doesn’t meat this criteria, re-adjust the MLG actuator up-stop to achieve this condition.
Parent topic