Install Parachute Egress Panel
100713-00
Use the following procedure to install the Parachute Egress Panel.
Applicable Aircraft Serial Numbers
All
Type of Maintenance
Line
Level of Certification
LSA-RM
Task Specific Training Required
No
Special Tools Required
None
Parts Required
None
Aircraft System and Number
16—ICON Parachute System (IPS)
Safety Equipment
As Needed
Consumables
Powder-Free Nitrile Gloves (As Required)
TT-I-735-A, or equivalent (ISOPROPYL ALCOHOL) (As Required)
Sharpie, Fine Point (As Required)
Aluminum Speed Tape (As Required)
Popsicle Sticks (As Required)
CA Superglue (As Required)
QA-6 NCF Quick-aerosol (CA Glue Accelerator) (As Required)
3M Firebarrier 2000 PLUS (FIRE BARRIER SILICONE SEALANT, 3M) (As Required)
Task Instructions
1. Best-fit the IPS Egress Panel in the joggles of the Upper Center Wing Skin such that there is a consistent joggle-edge gap all around. Check that a consistent bond-gap of 0.005 to 0.020 inch is achievable while the a-surface of the IPS Egress Panel is approximately flush (flush ± 0.020 inch) with the outer surfaces of the Upper Center Wing Skin.
2. Prepare the bond surfaces of the Upper Center Wing Skin and IPS Egress Panel. (Paint
Touch Up Procedures)
Note:
Ensure adhesive does not contact the parachute or rocket components.
3. Apply a continuous bead of adhesive (3M Fire Barrier 2000+, maintain a circular bead diameter of approximately 0.0625-0.125 inch) upon the Upper Center Wing Skin all-around the IPS Egress Panel Bond Interface. Center, as best as possible, the bead upon the joggled bond flange. Use a fixture, if necessary to maintain the consistent bond-gap of 0.005 to 0.020 inch and to ensure the a-surface of the IPS Egress Panel is approximately flush (flush ± 0.020 inch ) with the outer surfaces of the Upper Center Wing Skin. Ensure adhesive squeezes out beyond the exterior edge of the IPS Egress Panel into the joggle-edge-gap. Filllet the adhesive.
Figure 476. Egress Panel Bonding
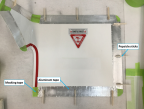
Figure 477. Egress Panel Prep

4. Allow adhesive to cure for 24 hours.
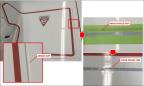
5. Minimally apply a continuous bead of adhesive (3M Fire Barrier 2000+) as required to fil joggle-edge-gap. Wipe away and smooth excess adhesive to create an approximately flush (flush ± 0.020 inch) transition from the Upper Center Wing Skin to the IPS Egress Panel. Ensure the adhesive is applied such that there is a clean edge, with a maximum profile tolerance of 0.020 inch. (Consider masking the extents of the joggle gap with masking tape to provide a means to produce a clean edge following the filling opertation. Remove the masking tape while the adhesive is still wet.
Figure 478. Fit Check
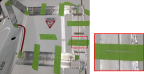
Figure 479. Final Prep
6. Solvent clean any excess adhesive with Isopropyl Alcohol.
7. Allow adhesive to cure for 24 hours.
Verification Method
Check that a consistent bond-gap of 0.005 to 0.020 inch is achievable while the a-surface of the IPS Egress Pane is approximately flush (flush ± 0.020 inch) with the outer surfaces of the Upper Center Wing Skin.
Parent topic