Install Seawings™ Platform Tip
100574-00
Install a Seawings™ platform tip. The tips are designed to be readily replaced in case of damage.
Applicable Aircraft Serial Numbers
All
Type of Maintenance
Line
Level of Certification
LSA-RM
Task Specific Training Required
No
Special Tools Required
None
Parts Required
ICA008108 (RH Seawings™ Tip)
ICA008109 (LH Seawings™ Tip)
Aircraft System and Number
08—Fuselage and Vertical Tail
Safety Equipment
As Needed
Consumables
Isopropyl Alcohol
Carnauba Wax
AC-251 Black Class B Aerospace Sealant
Torque Stripe
Task Instructions
1. Before installing the original or replacement tip, inspect its condition, verifying no cracks or other structural issues and that the four attachment bushings are in good condition and securely bonded in place
2. Clean Seawings™ tip and Seawings™ skin with isopropyl alcohol. Allow to dry completely prior to proceeding with installation.
3. Apply carnauba paste wax onto the RH mating surfaces of the entire top and bottom interfaces of the fuselage and Seawings™ tip. Allow 5 minutes for the wax to flash off. Wipe carnauba wax off using a lint free cloth to leave thin film of residue on the mating surface. Repeat step a total of 3 times. Repeat process for LH side.


Note:
Ensure that the work area is ready for the adhesive to be applied and that all tools, consumables, PPE, etc. are quickly within reach. AC-251 B-1/2 adhesive has a minimum application life of 30 minutes at 77° with a relative humidity of 50%. The application life is dependent on the temperature and humidity of the work environment.
4. Mix AC-251 adhesive per manufacture instructions.
a. Holding the cartridge, grasp the dasher rod and pull back approximately one inch.
b. Insert the ramrod into the hollow of the dasher rod break the piston loose, and inject about 1/3 of the contents into the cartridge. Do not inject all of the catalyst in one location. Distribute evenly throughout the base material.
c. Repeat steps 1 and 2 until all the contents of the rod are emptied into the cartridge. Remove the ramrod.
d. Mix for the required number of strokes (hand mix: 50-75 strokes) or for the required amount of time (Machine mix: 37 strokes [1.5 minutes at 25 strokes/min])
e. When mixing is complete, remove bottom cap.
f. Pull the dasher rod back to the neck of the cartridge, grasp the cartridge firmly at the neck, unscrew the dasher rod and remove.
g. Screw the nozzle into the cartridge, insert into the extrusion gun and use as required. For hand extrusion, press the used dasher rod against the plunger to force the material from the cartridge.
Note:
Mix the cartridges of AC-251 adhesive one by one as they are needed. Do not mix all the adhesive at once.
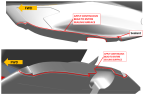
5. Apply a 1/8” to 1/4” diameter continuous bead of adhesive approximately centered along indicated (highlighted in red) curve. Repeat process for LH side.
Figure 182. Sealant Application to Seawings™
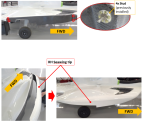
6. Place RH Seawings™ tip on to 4x studs (previously installed) on the fuselage. Repeat for LH side.
Figure 183. Seawings™ Tip Installation
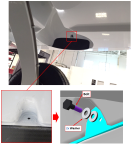
7. Attach Seawings™ tip to the fuselage using AN3-C5A bolt with 2ea NAS1149C0363R washers into existing nutplate.
Figure 184. Seawings™ Attachment Hardware
8. Torque bolt to 26 in-lbs. Apply Torque Stripe.
Verification Method
Firmly grasp the Seawings™ tip and, tugging up/down and fore/aft, verify that it is securely attached and that there are no large open gaps between it and the Seawings™.
Parent topic