Canopy Latch Rig
100742-01
Use the following task to rig the canopy latch.
Applicable Aircraft Serial Numbers
00130+
Type of Maintenance
Line
Level of Certification
LSA-RM
Task Specific Training Required
No
Special Tools Required
ITL002660 (TORQUE WRENCH ADAPTER)
Parts Required
3x 96710A261 (SCREW)
Aircraft System and Number
02—Doors and Windows
Safety Equipment
As Needed
Consumables
LOCTITE 243 (THREADLOCKER, PRIMERLES, OIL TOL, REMOVABLE MED STR, BLUE)
TT-I-735A or equivalent (ISOPROPYL ALCOHOL)
ICA012078 (LUBRICANT, GENERAL PURPOSE)
Task Instructions
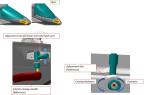
1. Remove the interior canopy latch to access the adjustment nut. Save handle and set screw for later installation.
2. If re-rigging only, slightly loosen latch arm.
3. Turn the adjustment nut clockwise/counter-clockwise to raise the latch arm.
4. Tighten the latch arm and test the closing/open torque.
Note:
Do NOT torque adjusted nut. For adjustment purposes only.
Figure 29. Latch Arm
5. While sitting in the cockpit, with the canopy closed, use a force gauge or tool ITL002660, adapter, and torque wrench to adjust until the operation torque requirement is achieved to close/open canopy latch.
◦ 25 MAX in-lbs to close canopy
◦ 20-35 in-lbs to open canopy
Figure 30. Close/Open Canopy Latch
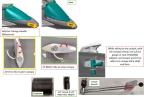
6. Verify the operation torque requirement is achieved to close/open canopy latch.
◦ 25 MAX in-lbs to close canopy
◦ 20-35 in-lbs to open canopy
Figure 31. Close/Open Canopy Latch
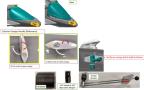
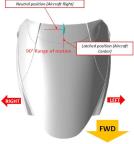
7. Confirm canopy latch functionality. Latched position—canopy latch handle should be oriented forward. Unlatched position—canopy latch handle should be oriented towards aircraft right.
Figure 32. Confirm Canopy Latch Functionality
Note:
the swing arm mechanism should naturally return to the “NEUTRAL” position when latch is not engaged.
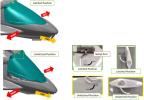
8. Verify canopy latch range of motion. Latched position—the latch arm shall engage the detent on the strike plate ramp when installed in aircraft. Neutral (Unlatched) position—the latch shall return to its neutral position and contact the mechanical stop on the shuttle with no external force applied.
Figure 33. Verify Canopy Latch Range of Motion
9. Latch arm.
a. Once rigging is achieved, remove the latch arm entirely.
b. Using isopropyl alcohol, clean surfaces where threadlocker (Loctite 243) will be applied.
c. Apply threadlocker (Loctite 243) to threads of the latch arm and install back into latch shaft. Torque to 40-45 in-lbs.
Figure 34. Latch Arm
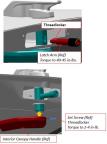
10. Interior canopy handle.
a. Using isopropyl alcohol, clean surfaces where threadlocker (Loctite 243) will be applied.
b. Apply threadlocker (Loctite 243) to interior canopy handle set screw (previously removed), then install the interior latch handle and setscrew to secure it in place. Torque to 2-4 in-lbs.
Figure 35. Clean Interior Canopy Handle
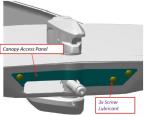
11. Using isopropyl alcohol, clean surfaces where lubricant will be applied. With lubricant and 3 screws install canopy access panel.
Verification Method
See Steps 7 and 8 for verification method.
Parent topic