Install OAT Sensor
100599-01
Use the following procedure to install the OAT sensor.
Applicable Aircraft Serial Numbers
00139+
Type of Maintenance
Line
Level of Certification
LSA-RM
Task Specific Training Required
No
Special Tools Required
None
Parts Required
ICA014698 (SENIOR ASSY, OAT GTP 59, GARMIN)
NAS1515H5L (WASHER, FLAT, NYLON, .328 ID, .562 OD, .031 T)
2x CABLE-TIE, NYLON 6-6, 30LB, 5.50, TY-RAP
Aircraft System and Number
10—Instruments (and Avionics)
Safety Equipment
Safety Glasses
Consumables
Isopropyl Alcohol
LOCTITE® 243™ (THREADLOCKER, PRIMERLESS, OIL TOL, REMOVABLE MED STR, BLUE)
Task Instructions
1. Install OAT sensor body through hole in fuselage skin.
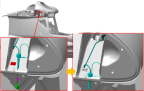
2. Using isopropyl alcohol, clean surfaces of nut where threadlocker will be applied.
3. Apply threadlocker to lower threads of nut as installed.
4. Install Nylon washer and nut onto OAT sensor.
Note:
Loctite should not permeate washer.
5. Torque nut to 15-18 in-lbs.
6. Route D9141J connector from OAT sensor through pass through in center wing rib. Secure to cable tie block in center wing using 1x cable tie.
7. Install fixed grommet into pass-through hole.
8. Connect D9141J from OAT sensor to D9141P on harness. Verify locking features of connector are engaged.
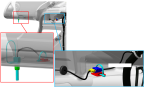
9. Wrap connector D9141P with F4Tape to improve hold and secure to cable tie block using 1x cable tie.
Verification Method
Turn on master switch, verify the G3X display is displaying the correct outside air temperature.
Parent topic