Bilge Pump Installation
100065-00
The following task should be used to install the bilge pump.
Applicable Aircraft Serial Number
00001-00020
Type of Maintenance
Line
Level of Certification
LSA-RM
Task Specific Training Required
No
Special Tools Required
None
Parts Required
TY528MX Cable Tie
Aircraft System and Number
03—Electrical Systems
Safety Equipment
As Needed
Consumables
Sil-Poxy® Silicone Adhesive
Task Instructions
1. Remove any adhesive residue from the bilge pump mounting flange.
Figure 45. Remove Bottom Screen
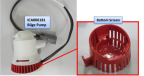
3. Slide bottom strainer into place under the mounting flange.
4. Install the pump body onto the bottom strainer by aligning it and rotating clockwise until locked. (Figure 46)
Figure 46. Lock Bottom Strainer
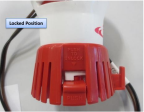
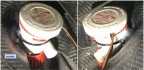
Figure 47. Secure the Pump to Mounting Flange

6. Apply Sil-Poxy adhesive around the mounting flange, completely covering the cable tie as shown. (Figure 48)
Figure 48. Apply Sil-Poxy
7. Attach the bilge pump hose to the pump barb fitting and secure with a 20-32/9-WS hose clamp.
8. Connect D9009J connector on bilge pump to D9009P connector on main wire harness.
9. Test that the bilge pump operates normally.
10. Install the fuel tank mounting structure if needed.
Verification Method
The task is complete when both the bilge pump and the fuel bladder tank are installed.
Parent topic