Engine Coolant Replacement
100147-00
This procedure covers draining coolant from the engine and radiator, overflow bottle, and ECS system. Perform all three or only the ones that are required for the specific maintenance situation.
Applicable Aircraft Serial Numbers
All
Type of Maintenance
Line
Level of Certification
LSA-RM
Task Specific Training Required
No
Special Tools Required
None
Parts Required
None
Aircraft System and Number
13—Propulsion
Safety Equipment
As Needed
Consumables
LOCTITE® 243™
CAUTION:
Never open the radiator cap when the cooling system is hot. Doing so could result in the escape of hot coolant and result in scalding. Always allow engine to cool to ambient temperature before start of any work on the cooling system. Cover the radiator cap with a rag and open slowly even when sure it is cool.
Note:
Only use specified coolant. (Approved Engine Oils and Capacity)
Task Instructions
1. Remove the top cowling.
2. Place a bucket under the engine bay drain hole on the right side of the fuselage just aft of the Seawings™. A shaped piece of aluminum adhesive tape placed under the drain hole may help direct the flow into the bucket.
CAUTION:
Never open the radiator cap when the cooling system is hot. Doing so could result in the escape of hot coolant and result in scalding. Always allow engine to cool to ambient temperature before start of any work on the cooling system. Cover the radiator cap with a rag and open slowly even when sure it is cool.
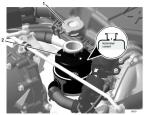
Figure 392. Engine Coolant Replacement
4. Drain the coolant from the engine and radiator as follows:
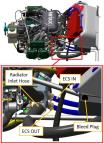
a. Locate the radiator hose that connects the coolant thermostat to the radiator inlet (see Figure 393). Loosen the radiator hose clamp at the thermostat and pull the hose off the thermostat housing.
b. Drain the coolant into the engine bay; the firewall will catch the coolant and direct it out the fuselage drain hole.
c. After draining is complete, reinstall the radiator hose on the thermostat housing and tighten its hose clamp.
Figure 393. Engine Coolant Replacement
5. Drain the coolant from the overflow bottle as follows:
a. Cut the cable tie and disconnect the black silicone hose from the bottom nipple on the overflow bottle. Catch the coolant in a suitable container as it drains from the bottle and hose.
b. Reattach the black silicone hose to the nipple on the bottom of the overflow bottle and secure using a TY24MX cable tie.
6. Drain the coolant from the ECS system as follows:
a. Locate the two ECS hoses where they attach to the forward face of the thermostat.(See Figure 393)
b. Loosen the hose clamps and pull both hoses off the thermostat.
c. Turn on the master switch and turn the heater knob so that the heater valve opens.
d. Apply air pressure-not to exceed 12 psi-to the end of the ECS IN hose. Continue until coolant has been blown from the heater lines and core.
e. Reinstall both hoses and tighten the hose clamps.
f. Turn off the heater control and master switch.
7. Remove the bleed plug on the top-right-aft corner of the radiator with a 3/16 hex wrench (see Figure 393).
8. Fill coolant at the expansion tank until coolant with no bubbles flows from the radiator bleed port.
9. Replace the radiator bleed plug by applying LOCTITE® 243™ to its threads. Torque it by threading in finger tight, then rotating an additional 3/4-1 turn.
10. Fill the expansion tank until the cooling system is full (see Figure 392), then install the radiator cap.
Note:
The radiator cap must be tightened until the stop lug is contacted.
11. Fill the overflow bottle half full.
12. Use a garden hose adjusted to a gentle flow rate to rinse spilled coolant form inside the engine bay, continuing until clear water emerges from the fuselage drain.
13. Run the engine for about five minutes or until the coolant temperature starts to rise.
14. Shutdown the engine and allow it to cool.
15. Verify that there are no coolant leaks, looking specifically at the hose connections that were disturbed.
16. Check the coolant level and replenish as needed.
17. Install the top cowling.
Note:
Used coolant is a hazardous waste and should be disposed of in a responsible manner.
Verification Method
Procedure is complete when steps are complete.
Parent topic