Flap Surface Installation
100176-00
Use the following procedure to install the flap surface on the wing.
Applicable Aircraft Serial Numbers
All
Type of Maintenance
Line
Level of Certification
LSA-RM
Task Specific Training Required
No
Special Tools Required
None
Parts Required
None
Aircraft System and Number
14—Wing
Safety Equipment
As Needed
Consumables
None
Note:
On new installations, the version of hinge pin that is retained with a cotter pin should be used.
Task Instructions
1. Verify that the flaps are still commanded to the 30° position.
2. Support the flap with a cradle from below or with a helper.
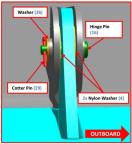
3. Align the hinges flap to wing and install the washers and pins at each of the three hinge locations per flap as shown in Figure 449. To minimize the gap between hinge elements, use 95630A460PTFE washers as needed but with a minimum of one on each side of the flap hinge tang. Typically, there will be two PTFE washers used in each gap at the center hinge (center hinge is shown in Figure 449). An NAS1149C0332R washer should be used under each cotter pin.
Figure 449. Flap Surface
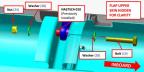
4. Install the AN4C13A bolt, MS21043-4 nut and two NAS1149C0432R washers that attach the flap pushrod to the flap surface of the affected flap (see Figure 450).
Figure 450. Flap Surface
Verification Method
Verify correct flap operation and rigging. (Inspect
Flap Rigging)
Parent topic