Install Aircraft Battery—Configuration B
100327-00
Use this procedure to install the batteryin Configuration B.
Applicable Aircraft Serial Numbers
00154+
Type of Maintenance
Line
Level of Certification
LSA-RM
Task Specific Training Required
No
Special Tools Required
None
Parts Required
24 Ah Battery:
1x RG-25XC (BATTERY, VRLA, 12V 24AH)
1x ICA014287 (STRAP ASSY, TIE-DOWN, POLYESTER & 2X RUBBER, 1.0 WIDE)
11 Ah Battery:
1x ICA014884 (BATTERY, VRLA, 12V 11AH)
1x ICA014995 (STRAP ASSY, TIE-DOWN, POLYESTER & 2X RUBBER, RG-12LSA)
Common Parts:
4x ICA014327 (FOAM STRIP, ADH-BACKED, FR, BUNA-N, .25 X 1.0 X 4.25)
1x ICA014561 (FOAM STRIP, ADH-BACKED, FR, BUNA-N, .25 X 1.0 X 1.5)
1x ICA013995 (LATCH, TOGGLE, SPRING CLAW, SAFETY CATCH, 304SS)
1x ICA013801 (TAB, J-HOOK, 1.00 STRAP, 316L SS, .036)
Aircraft System and Number
03—Electrical System
Consumables
ICA012078 (LUBRICANT, GENERAL PURPOSE)
TT-I-735A or equivalent (ISOPROPYL ALCOHOL)
TT-M0261 or equivalent (MEK: METHYL ETHYL KETONE)
O-A-51 or equivalent (ACETONE)
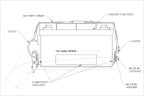
Figure 40. Battery Instl—View Looking Inboard from RHS
Task Instructions
1. If removed, secure J-Hook to the FWD side of the Battery Tray with the lock nut and washer previously removed. Apply lubricant to stud and torque #6 hardware to 7.8-9.3 in-lbs (11.1-13.1 in-lbs for #8 hardware). Figure 40
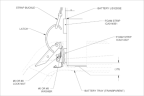
2. If removed, secure Latch to the AFT side of the Battery Tray with the lock nut and washer previously removed. Apply lubricant to stud and torque #6 hardware to 7.8-9.3 in-lbs (11.1-13.1 in-lbs for #8 hardware). Figure 41
Figure 41. Latch Me Chanism
3. If removed, secure one end of the strap to the J-Hook by pulling on the strap until it snaps into the J-Hook. Figure 40
4. Clean the four sides of the Aircraft Battery with Isopropyl Alcohol, MEK, or acetone.
5. Install one foam strip (ICA014327) .25 inches from the base of the Aircraft Battery and centered on each side of the Aircraft Battery as shown in Figure 40 and Figure 41.
6. Install one foam strip (ICA014561) horizontally on the AFT side of the Aircraft Battery right below the top lid as shown in Figure 41.
7. Slide the Aircraft Battery forward into the Battery Tray and place down into place.
8. Pull Battery Strap over the top of the Aircraft Battery.
10. Ensure the Battery Strap is positioned flat from FWD to AFT edge of the Aircraft Battery.
11. Close the Latch until it clicks. Ensure the Latch is closed.
12. Reconnect the positive battery terminals first: T9181, T9054.
13. Reconnect the negative battery terminals: T9069, T9076, T9182.
Verification Method
Complete the Engine Test Run. (Engine
Test Run)
Parent topic