Install Engine Oil Tank Quick Valve and Fitting Washer
100718-00
Use the following instructions to install engine oil tank quick valve and fitting washer.
Applicable Aircraft Serial Numbers
All
Type of Maintenance
Line
Level of Certification
LSA-RM
Task Specific Training Required
No
Special Tools Required
None
Parts Required
3X 097-116 (BLUE NYLON GASKET)
Aircraft System and Number
13—Propulsion
Safety Equipment
As Needed
Consumables
MS20995C32 (SAFETY WIRE)
Task Instructions
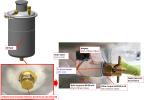
a. If installing new oil tank, remove existing drain plug and copper washer from bottom of oil tank and discard.
b. Inspect threads to ensure drain valve threads are compatible with threads in oil tank.
c. Install (3X) 097-116 Nylon Gaskets.
d. Install drain valve with the bolt and nylon gaskets as shown and torque bolt to 80-85 in-lbs. Apply torque seal.
e. Ensure drain valve is in the closed position as shown.
Figure 405. Drain Valve
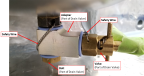
CAUTION:
Be cautious to avoid loosening oil drain while safety wire is being installed.
2. Install safety wire onto valve and adapter. After securing valve to adapter, install safety wire to secure bolt to oil tank. A separate piece of safety wire secures the bolt to the oil tank and a second piece of safety wire secures the valve to the adapter. (Figure 406)
Figure 406. Safety Wire
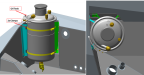
3. Reinstall the oil tank back into the aircraft in the orientation as shown and tighten the oil tank clamps. The tank lid may have to be reoriented to get the drain valve oriented as shown. Ensure oil tank drain valve does not contact firewall (minimum clearance is .25 inches). (Figure 407)
Figure 407. Oil Tank
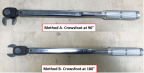
4. Reconnect oil lines to oil tank. Torque B nut to 300-350 in-lbs if using Method A or to 290-330 in-lbs if using Method B. Apply torque seal. (Figure 408)
Figure 408. Torque Methods
5. Service the oil tank and purge lubrication system in accordance with the latest Rotax 912iS Installation Manual.
Verification Method
Ground run the engine verify oil pressure is within limits and no leaks.
Parent topic