Main Landing Gear (MLG) Boot Installation
100414-00
Use this procedure to install the MLG boot after it has been removed.
Applicable Aircraft Serial Numbers
All
Type of Maintenance
Line
Level of Certification
LSA-RM
Task Specific Training Required
None
Special Tools Required
ICA009749 (WING HARD JACKING POINT)
Parts Required
None
Aircraft System and Number
11—Landing Gear
Safety Equipment
As Needed
Consumables
Sil-Poxy® Silicone Adhesive
Task Instructions
1. Remove any remaining boot adhesive from the Seawings™ and landing gear leg.
2. Clean the bonding surfaces of Seawings™, leg, and boot flanges with isopropyl alcohol and a clean cloth.
3. Retract the landing gear halfway up from the extended position. Slide the boot up until the boot’s flange fits well against the mating flange on the Seawings™, with boot in a relaxed state. The figure below shows the proper location of the boot flange and boot cuff. Take care to locate the boot cuff at the distance shown from the trunnion.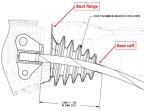
4. Bond the boot cuff to the landing gear leg by injecting or by lifting and troweling Sil-Poxy® adhesive into the joint. Be careful to get a good seal all around. Ensure that the boot cuff is located as shown above. Wipe off excess adhesive with a paper towel.
Note:
The working time of Sil-Poxy is five minutes. Each bonding operation must be completed in this time or the strength of the joint may be reduced. The initial cure time is 15 minutes with full strength achieved in 24 hours at room temperature (73°F).
5. Use adhesive tape to secure the boot cuff to the gear leg so that it does not shift and disturb the bond while the subsequent bond operations are performed. An alternate and safer approach is to let the boot cuff bond to the gear leg fully cure (24 hours) before the boot flange bond to the Seawings™ is performed.
6. Apply Sil-Poxy® adhesive to the boot flange and press against Seawings™. Wipe off excess adhesive with a paper towel. The viscosity of the adhesive is adequate to hold the boot flange in place during the curing process.
7. Install the axle and wheel assemblies using the MLG Wheel and Axle procedure. (Main Landing Gear (MLG) Wheel and Axle Installation) Leave the aircraft on the jacks until the verification checks are complete. Allow the boot cuff and boot flange joints to fully cure (24 hours) before conducting the verification checks.
Verification Method
Retract and extend the landing gear to verify system function. Repeat until 10 up/down cycles have been completed, with a 30 second dwell between each up or down actuation.
Verify that the system actuates without fuse failure. If fuse failure occurs, contact ICON Owner Support for further instructions.
Parent topic