Install Pitch Trim Actuator
100457-00
The pitch trim installation procedure is needed as part of the process of replacing the actuator and testing its function.
Applicable Aircraft Serial Numbers
All
Type of Maintenance
Line
Level of Certification
LSA-RM
Task Specific Training Required
No
Special Tools Required
None
Parts Required
ICA006821 TRIM ACTUATOR
Aircraft System and Number
06—Flight Controls
Safety Equipment
As Needed
Consumables
Tef-Gel®
Task Instructions
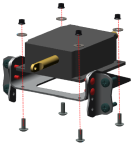
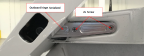
1. Mount new ICA006821 trim actuator to the pitch trim bracket by installing the four mounting cross head screws, washers, and nuts previously removed as shown.
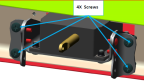
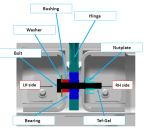
2. Install actuator and bracket back into the horizontal tail by first connecting the D9017J connector to the D9017P connector in the horizontal tail and installing the four cross head screws as shown. Torque to 14 in-lbf.
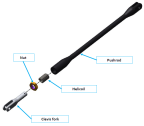
3. If pushrod needs to be replaced for wear, assemble the pushrod (ICA013758), helical coil (1191-4CN500), jam nut (AN316C4R), and fork (ICA008302) as shown.
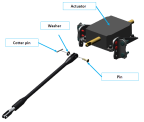
4. Install push rod assembly on actuator by installing clevis pin (MS20392-1R11), washer (NAS1149CN432R), and cotter pin (MS24665-151) as shown.
5. Install the elevator by carefully guiding the elevator trim tab pushrod through the elevator and securing the elevator outboard hinges with four screws, (right side shown, repeat for left side). Torque screws to 26 in-lbf.
6. Install elevator center hinge bolt and washer as shown. Apply Tef-Gel® prior to installing and torque to 26 in-lbf.
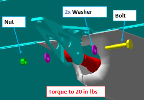
7. Install the elevator push tube rod end hardware as shown and torque to 20 in-lbf.
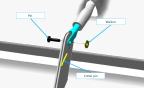
8. Connect trim tab pushrod to the trim tab, as shown, by installing the pin (MS20392-1R11), washer (NAS1149CN432R), and cotter pin (MS24665-151). Do not bend the cotter pin until rigging in next step is complete.
9. Install the horizontal tail tips.
Verification Method
Check and make adjustments as needed to the pitch trim rigging. (Inspect
Pitch Trim Tab Rigging)
Parent topic