Elevator Installation
100739-00
The following instructions are used to install the elevator.
Applicable Aircraft Serial Numbers
All
Type of Maintenance
Line
Level of Certification
LSA-RM
Task Specific Training Required
No
Special Tools Required
Digital level (inclinometer) with 0.1° resolution
Parts Required
None
Aircraft System and Number
06—Flight Controls
Safety Equipment
As Needed
Consumables
ICA012078 (GENERAL LUBRICANT)
Task Instructions
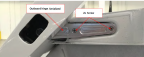
1. Install the elevator by carefully guiding the elevator trim tab push rod through the elevator and securing the elevator outboard hinges with four screws. Torque screws to 26 in-lbs. (Figure 200)
Figure 200. Elevator Install
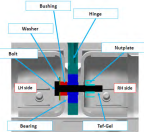
3. Install elevator center hinge bolt and washer. Apply lubricant prior to installing and torque to 26 in-lbs.Figure 201
Figure 201. Center Hinge Attachment
Verification Method
1. Use adhesive tape between elevator trailing edge and elevator tips to temporarily align the elevator to neutral deflection, in alignment with the horizontal tips.
2. Temporarily secure a digital inclinometer on top of the trim tab, aligned fore/aft with some double sided tape. Be sure the inclinometer does not interfere with tab operation then use the alternate-zero function of the inclinometer to set the display to zero.
3. Turn on the master switch.
4. Check full down travel indication position of the trim tab by actuating trim switch until the trim actuator stops in the full down position and measure the trim tab angle with respect to the elevator upper surface, check that it is 15° ± 2° trailing edge up.
5. Check full up travel indication position of the trim tab by actuating the trim switch until the trim actuator stop in the full up position and measure the trim tab angle with respect to the elevator upper surface, check that it is 21° ± 2° trailing edge down.
6. If these tolerances are not met, adjust the trim tab fork in or out to achieve them. Once complete, torque the jamb nut on the fork to 60 in-lbs and bend the cotter pin on the fork.
7. Turn off the master switch.
8. Remove tape from elevator trailing edge.
Parent topic