Angle of Attack (AOA) Leak Check ProcedureAOA System Testing
100464-01
Instructions for conducting the pitot-static-AOA leak check with the test equipment.
CAUTION:
The Multiple Systems Controller (MSC) is a delicate instrument. Care must be taken when applying pressure to the Angle of Attack (AOA) system to avoid pressures and rapid changes of pressure that could damage the instruments.
Task Instructions
1. Prepare the Preston Pressure Pitot-Static Tester Model PS-525 for use.
2. Connect the static port hose to Vacuum side of the PS-525 unit.
Note:
The static port hose has barbed fitting reducer to a smaller hose on one end along with a BFST26-820 fitting at the end.
3. Locate the upper AOA port on the left wing mid span. Using ITW Tacky tape, secure the BFST26-820 connector to the upper wing surface ensuring there is no air leak around the AOA port.
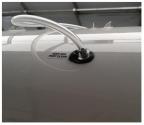
4. Drape the hose up to the upper wing surface to remove any strain on the hose that could cause the tacky tape to slowly peel off.
5. Close the Pressure Control, Pressure Vent, Vacuum Control, and Vacuum Vent valves.
Note:
DO NOT Over tighten the valves
6. Open the Crossbleed valve.
7. On the front panel of the PS-525 tester, ensure that the Pressure Pump and Vacuum Pump switches are both OFF.
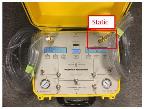
8. Power on the PS-525 to 12 volts by pulling up on the power switch in the center of the box to unlock, then swinging the switch down to +12 V.
Note:
The system will go through a boot cycle then should display as shown in the top photo with a variation in altitude depending on the ambient conditions of the day. Note the altitude shown as a reference for future steps.
Note:
For greater accuracy, the tester should be powered on for 15 minutes before use.
9. Switch on the Vacuum Pump until it reads 15-20 inHg on the Vacuum Reservoir indicator.
10. Carefully open the Vacuum Control valve. It will turn approximately 3/4 of a turn (counter-clockwise) before the valve opens. Climb the altitude on the display no faster than 4,000 ft/min to approximately 1000 ft greater than the indicated number with the Vacuum Control valve closed and the Vacuum Vent open. Carefully close the Vacuum Control valve.
Note:
In the above example the altitude should be increased to approximately 1066 ft.
Note:
Should you exceed the desired altitude, carefully open the Vacuum Vent to bleed off the altitude until the desired altitude is indicated.
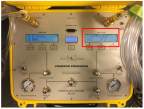
11. Press the Leak Check button under the Altitude display.
12. Press Leak Check two more times until the screen indicates 60 sec, then press the Units button to start the leak check.
Note:
The ICON standard is no more than a 50 feet total leak over 60 seconds.If leak rate exceeds this, check AOA connections. (Pitot-Static-AOA Leak Troubleshooting)

13. Press Exit on the Altitude display.
14. Repeat the steps above for the lower AOA port.
15. Return the system to ambient pressures by carefully opening the Pressure Vent valve ensuring not to exceed 4,000 ft/min on the Altitude display.
16. Carefully open the Vacuum Vent valve.
17. Carefully open the Vacuum Control valve until the Vacuum Reservoir indicator shows 0 inHg.
18. Repair the AOA system if needed and repeat the leak tests until both upper and lower AOA port pass the test.
19. Open all valves for storage.
20. Turn the PS-525 tester unit power to Display Off.
21. Record the results of the AOA system leak check in the Verification Method form of the parent task. (Pitot-Static-AOA
Leak Test Procedures)
Parent topic