Remove Canopy Latch Mechanism
100740-00
Use the following procedure to remove the canopy latch mechanism.
Applicable Aircraft Serial Numbers
00130+
Type of Maintenance
Line
Level of Certification
LSA-RM
Task Specific Training Required
No
Special Tools Required
None
Parts Required
None
Aircraft System and Number
02—Doors and Windows
Safety Equipment
As Needed
Consumables
None
Note:
Remove the following parts as required. It is acceptable to retain and reuse any serviceable parts and hardware. Otherwise procure replacements.
Task Instructions
Figure 17. Canopy Latch Cover Panel
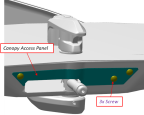
Figure 18. Latch Arm Removal
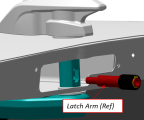
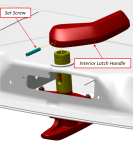
Figure 19. Interior Latch Handle Removal
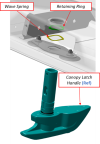
4. Remove the exterior latch handle by removing the wave spring and retaining ring, then sliding the shaft out from the frame.
Figure 20. Exterior Latch Handle Removal
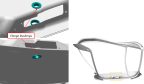
5. If necessary, remove damaged or loose flanged bushings from the canopy frame. To dis-bond the bushings:
a. Carefully break the bond between the affected parts. Use tools as required to maximize cleavage or peel stress at the edge of the bond line. Try to focus the load application such that internal part stress is minimized; prevent bending and torquing of parts.
b. Carefully cut away the component as required.
c. Remove any remaining adhesive by sanding with aluminum oxide paper until the base laminate is exposed. Do not damage the laminate.
Note:
Be careful not to damage the composite surfaces during removal.
Figure 21. Canopy Frame Bushing Removal
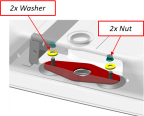
6. Remove the latch plate if damaged. Remove the two nuts and washers.
Figure 22. Canopy Latch Plate Removal
Verification Method
Canopy latch mechanism has been removed.
Parent topic