Replace Oil Line from Oil Tank to Oil Thermostat
100732-00
Use the following instructions to remove and replace oil line from oil tank to oil thermostat.
Applicable Aircraft Serial Numbers
All
Type of Maintenance
Line
Level of Certification
LSA-RM
Task Specific Training Required
No
Special Tools Required
None
Parts Required
ICA013170 (HOSE ASSY, OIL, 90-90, AN-8X19.875INCH)
Aircraft System and Number
13—Propulsion
Safety Equipment
As Needed
Consumables
F4TAPEBLACK as required (TAPE, SELF-FUSEING, SILICONE, .02 IN THK, 1 IN WIDE)
TY24MX as required (CABLE TIE, NYLON 6-6, 30LB, 5.50, TY-RAP)
Torque Stripe
Isopropyl Alcohol
Task Instructions
1. Remove oil line from oil tank to oil thermostat.
2. Inspect condition of line. If any evidence of age or wear, such as cracking, rot, or corrosion, is found, replace the affected line in accordance with the following steps. Replace/re-secure insulation as required. (General
Hose Removal)
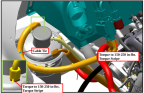
3. Install oil line from oil tank to fitting on oil thermostat. Torque 2x B nuts to 150-250 in-lbs. Using isopropyl alcohol, clean surfaces where torque stripe will be applied. Apply torque stripe to protruding threads, across the nut, washer, and onto the adjacent structure. Figure 375
Figure 375. Oil Line Tank to Thermostat
4. Secure oil line to cable tie anchor using 1x TY24MX cable tie.
Note:
Ensure oil line from tank to thermostat does not contact oil tank clamp.
Verification Method
Ensure torque stripe is applied and there are no leaks in the oil line after purging the system. See Rotax Maintenance Manual (Heavy Maintenance) for Rotax Engine Type 912 i Series.
Parent topic