Replace Overflow Bottle Overflow Hose and Cap
100724-00
Use the following instructions to replace the overflow bottle, overflow bottle hose, and the hose between the overflow bottle and expansion tank.
Applicable Aircraft Serial Numbers
All
Type of Maintenance
Line
Level of Certification
LSA-RM
Task Specific Training Required
No
Special Tools Required
None
Parts Required
922327 (OVERFLOW BOTTLE, ROTAX 912iS)
5552K25 as required (TYGON TUBING)
ICA011892 as required (HOSE, HIGH TEMP, SILICONE 1-PLY .250X.56)
ICA013376 (BARBED ELBOW, NYLON, 1/4 NPT)
ICA013375 (BLACK, NYLON, NUT)
Aircraft System and Number
13—Propulsion
Safety Equipment
As Needed
Consumables
F4TAPEBLACK as required (TAPE, SELF-FUSEING, SILICONE, .02 IN THK, 1 IN WIDE)
TY29MX (CABLE-TIE, NYLON 6-6, 120LB)
TY24MX (CABLE TIE, NYLON 6-6, 30LB, 5.50, TY-RAP)
180-220 Grit Sandpaper
Task Instructions
1. Cut the cable ties that secure the overflow tube to the coolant overflow tank and remove the overflow tube from the tank. (General
Hose Removal)
2. Cut the cable tie that secure the hose from the overflow bottle to the expansion tank and the 2x cable ties that secure the hose to the expansion tank hose.
3. Remove the overflow bottle from the engine bay and drain coolant.
4. Cut the new Tygon Tubing to 8.0 inches in length, ±.5 inch.
5. Unscrew cap from coolant overflow bottle.
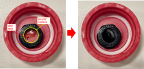
6. Locate the existing vent hole. Bore a larger hole using a 17/32 drill bit (.5313 in) as close to the center of the cap as possible so that the existing vent hole is removed completely and the hose fitting and nut will not interfere with the seal on the cap. It may be necessary to enlarge the hole slightly using 180-220 grit sandpaper/filing paper as required.
Figure 367. Coolant Overflow Bottle Overflow Hose Replacement
7. Insert hose fitting into new vent hole and secure hose fitting using black nylon nut. Ensure the nut does not interfere with the seal on the cap. Torque nut to 4.5-5.5 in-lbs.
8. Reinstall cap on bottle.
9. Install Tygon tubing on hose fitting and secure with cable tie.
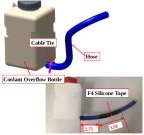
10. Cut a hose length of 9.75” ± .25”. This may be adjusted within tolerance to prevent chafing.
11. Apply F4 tape to the hose.
Figure 368. Coolant Overflow Bottle Hose Replacement
12. If replacing with a new overflow bottle;
a. Remove any labels
b. Minimally sand the hose barb using 180-220 grit sandpaper/filing paper to remove any mold flashing from hose nipple. The OD of the nipple should be smooth and uniform.
13. Secure the overflow tube to the coolant overflow bottle mount with cable tie with the end of the tube situated flush with the bottom of the bottle.
14. Secure the overflow bottle to the overflow bottle mount using 2x cable ties (TY29MX). Install the cable ties such that the cable tie heads are installed on adjacent corners.
Figure 369. Coolant Overflow Bottle Hose Replacement
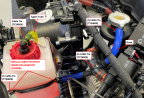
15. Route the coolant hose to the expansion tank between the expansion tank hose and the cylinder head. Ensure the hose does not contact the cylinder head. Secure the hose to the expansion tank using 1x cable tie (TY24MX).
16. Secure the section of hose wrapped with F4 tape to the expansion tank hose using 2x cable ties (TY24MX) in a crisscross pattern.
17. Secure Tygon overflow tube to the tie mount on the overflow bottle mount with 1x cable tie (TY24MX).
18. Service overflow bottle as needed.
Verification Method
Ensure that the cable ties are tight enough to secure the tube but not collapse the tube enough to impede coolant flow significantly. Replace
ECS Line Hose
Parent topic