Rigging Flap Controls
100544-00
Use the following procedure for flap rigging.
Applicable Aircraft Serial Numbers
All
Type of Maintenance
Line
Level of Certification
A&P
Task Specific Training Required
No
Special Tools Required
Aircraft Cable Tensiometer
Parts Required
As needed based upon inspections and condition of parts. Contact ICON Aircraft for assistance as needed. A list of part numbers in the flap cable system is below.
Part Number | Part Name | Quantity |
|---|---|---|
10F62MTF3/100 | SCREW, MACH FLH, 6LOBE, CRES, 10-32X.625 | 2 EA |
59915K483 | ROD END, FEMALE THD, PTFE LINED CRES, .312X.312-24X.688 | 2 EA |
AN316C5R | NUT, JAM, HEX, CRES, .313-24RH | 2 EA |
AN4C10A | BOLT, MACH, CRES, .250-28X.563 | 2 EA |
AN5C11A | BOLT, MACH, CRES, .312-24X.688 | 2 EA |
ICA011314 | PIN, BELL CRANK, FLAP | 1 EA |
ICA009500 | NUT, SPANNER, .75X16, FLAP INTERCONNECT | 2 EA |
ME000683-A | BELLCRANK, FLAP, SUBASSY | 1 EA |
ME000684-A | CABLE, FLAP, LH, SUBASSY | 1 EA |
ME000685-A | CABLE, FLAP, RH, SUBASSY | 1 EA |
MS21043-5 | NUT, SLFLKG, RDC HEX, CRES, .312-24 | 1 EA |
NAS1149C0416R | WASHER, FLAT, CRES, .250X.016, PSVT | 1 EA |
NAS1149C0516R | WASHER, FLAT, CRES, .328X.016, PSVT | 1 EA |
NAS1149C0563R | WASHER, FLAT, CRES, .312X.63, PSVT | 2 EA |
NAS1149C1232R | WASHER, FLAT, CRES, .750X.032, PSVT | 8 EA |
NAS1149C0532R | WASHER, FLAT, CRES, .312X.032, PSVT | 1 EA |
ME001018 | FLAP ACTUATOR, SUBASSY, Serialized | 1 EA |
LOCTITE 243 | THREAD LOCKER, LOCTITE 243, 10ml bottle | AS NEEDED |
ICA012078 | LUBRICANT, GENERAL PURPOSE | AS NEEDED |
ICA012079 | INSPECTORS LACQUER, ANTI-SABOTAGE, ORANGE | AS NEEDED |
Aircraft System and Number
06—Flight Controls
Safety Equipment
As Needed
Consumables
Powder-Free Nitrile Gloves
Powder-Free Latex Gloves
Isopropyl Alcohol
Anticorrosion/Lubricant/Tef-Gel
Torque Seal
Task Instructions
1. Remove AFT baggage panel to gain access to the flap actuator. (Removal
and Installation of Inspection Panels and Fairings)
2. Clean the noted damage area as required in accordance with ICA010822: STRUCTURAL REPAIR MANUAL, ICON A5, Section 10.1.
Warning:
Wear safety glasses when installing helicoils. Parts outside the aircraft, inside the aircraft installation orientation might be different.Figure 121
a. Set wings to the folded configuration per POH wing fold operation.
b. Adjust fuselage flap pin to achieve .200+.030/-.000 protrusion from the pin housing while the actuator is extended to the 0° actuator stop.
Note:
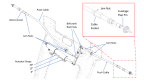
Push cable range of motion exceeds the required range of motion of the push pins, but in some cases the push cable position must be adjusted in the fuselage to avoid running out of push cable travel in one direction. Push cable position can be changed by loosening all jam nuts and running the bellcrank rod end and cable socket in or out equally.
Figure 121. Flap Rigging Diagram
4. If not extended, extend and lock wings.
5. Adjust the outboard push tube. Adjust rod end A and B length equally such that the flap bellcrank contacts the up-stop and the flap trailing edge lines up with the trailing edge of the center wing as described in Figure 122. Refer to Figure 121 for actuator location.
Figure 122. Wing Flap System Overview
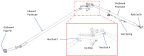
Figure 123. Flap Position Limit

a. Actuate the flap by hand. If the pushtube contacts the flap or wings, it is permissible to bias the pushtube body forward as necessary to eliminate the interference.
b. The outboard flap pin will move inboard or outboard by adjusting rod end C. Set the rod end length such that the outboard flap pin contacts the fuselage flap pin. Ensure the flap bellcrank still contacts the up-stop after setting rod end C length. Actuate the flaps and set the 15° and 30° actuator stops to limit the flap range of motion as described in Figure 123 above.
c. See Figure 121 for actuator stop locations. Actuate the flaps to 30° then back to 0°. Verify the flap returns to 0° due to the gas spring extension force. If the system does not return, adjust the 30° actuator stop to reduce range of motion. Ensure the flap travel limits are still within the tolerance specified in Figure 123.
Verification Method
Conduct the Check Flap Rigging Procedure (Inspect
Flap Rigging) to verify proper rigging.
Parent topic