Clean Coarse Fuel Filter
100196-00
Instructions to clean the coarse fuel filter on the aircraft.
Applicable Aircraft Serial Numbers
00001-00020
Type of Maintenance
Line
Level of Certification
LSA-RM
Task Specific Training Required
No
Special Tools Required
None
Parts Required
FX375-M (FILTER, FUEL CLEANABLE 62MICRON)
Aircraft System and Number
07—Fuel System
Safety Equipment
As Needed
Consumables
LOCTITE 243 (THREADLOCKER, PRIMERLESS, OIL TOL, REMOVABLE MED STR, BLUE)
MS20995C32 (WIRE, SAFETY, CRES, .032)
Task Instructions
Note:
Seat backs may be removed for easier access. (Remove Seat Back)
2. Close the fuel valve.
3. Use a rag or shallow containers to contain any fuel that leaks from the fuel lines or the filter itself.
4. Make a note of fuel flow direction through the filter.
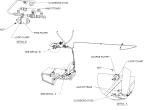
5. Using an 11/16 wrench, loosen the AN-6 fitting while securing the filter from rotation. Rotate the AN-6 connection fitting until completely free. (Figure 170)
Figure 170. MY17 Fuel System
7. Loosen the 10-32 nut on the click bond stud holding the loop clamp, which secures the fuel filter, with a 1/4 inch deep socket wrench until the filter is free.
8. Clean the fuel filter with a pressurized cleaner. Dry with compressed air. Lubricate and reinstall O-rings. Tighten end cap and re-safety wire with SAFETY WIRE.
Note:
If the filter is damaged, replace it with CLEANABLE 62MICRON FUEL FILTER (FX375-M).
9. Place the fuel filter approximately midway inside the loop type clamp.
10. Confirm that when installing the filter, the arrow direction is the same as before and the correct in and out fittings are tightened in the appropriate inlet and outlet fittings.
11. Wipe away or clean any fuel which may have dripped inside the cabin.
12. Tighten the AN-6 (9/16-18 thread) fittings on the inlet and outlet sides of the filter. Torque fittings to 110-130 in-lbs.
13. Torque the 10-32 nut on the click bond stud to 40 in-lbs.
14. Turn on fuel valve, turn on master power, turn key to A position, and check for leaks.
Verification Method
Complete engine test run and check for leaks. (Engine
Test Run)
Parent topic