Install Seat Back
100563-01
The following procedure is used to install the seat back.
Applicable Aircraft Serial Numbers
All
Type of Maintenance
Line
Level of Certification
LSA-RM
Task Specific Training Required
No
Special Tools Required
None
Parts Required
4x AN3C5A (BOLT)
1x AN3C6A (BOLT)
5x NAS1149C036R (WASHER)
ME000334-F (RH SEATBACK)
ME000335-F (LH SEATBACK)
Aircraft System and Number
NA
Safety Equipment
As Needed
Consumables
Tef-Gel® (ICA012078)
Task Instructions
1. Place seat back into position.
2. Place seat belt into channel.
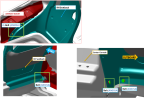
3. Install the seat back using the five seat back mounting bolts and washers with Tef-Gel®. (Figure 8) Torque all bolts to 25-28 in-lbs with a 3/8 wrench.
Note:
It is permissible to modify bolt grip lengths by one size and/or to use a maximum of four flat washers (maximum two under the head and two under the nut) in order to ensure that (1) bolt grip lengths extend completely through the load-bearing parts being assembled, (2) nut threads do not engage the unthreaded grip portion of the bolt, and (3) at least one thread protrudes from the associated nut or nutplate.
Figure 8. Seatback Installation Hardware Locations, Right Hand Side Pictured
4. Install the seat back closeout using the two screws (two for the LH and one for the RH) and one bolt with Tef-Gel®. Torque all screws and bolts to 25-28 in-lbs with a T20 Torx driver and 3/8 wrench.
Verification Method
The task was completed when the seat back is installed.
Parent topic