General Brake Line Termination Procedure
100209-00
Use the following procedure for preparing and cutting the brake line to length and adding banjo fittings.
Applicable Aircraft Serial Numbers
All
Type of Maintenance
Line
Level of Certification
LSA-RM
Task Specific Training Required
No
Special Tools Required
None
Parts Required
HDB01 Stainless Steel Braided Hose
HEA12 Olive (compression sleeve)
Appropriate Fitting (HYD-008P Straight B-nut, HEA01 Banjo, etc.)
Aircraft System and Number
11—Landing Gear
Safety Equipment
As Needed
Consumables
Tef-Gel®
Task Instructions
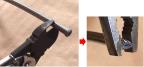
1. Cut hose to length with a pair of sharp hose or wire cutters.
2. Clean any debris from cut end and gently reshape back to circular section with a pair of pliers (see Figure 312).
Figure 312. General Brake Line Termination
3. Disassemble hose end fitting into its component parts, socket, olive, and main body (see Figure 313 for example using a banjo fitting).
Figure 313. General Brake Line Termination
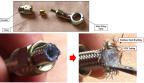
4. Place the socket over the end of the hose, orienting it as shown, with the female threaded end towards the end of the hose.
5. Use a small slot-head screwdriver to flare out the stainless steel braid at the end of the hose, separating them from the hose’s PTFE inner liner for a length of .2 inches minimum (see Figure 313).
6. Push the chamfered end of the olive onto the PTFE inner liner and under the stainless steel braid, making sure that all stainless strands are outside of the olive (see Figure 314).
Figure 314. General Brake Line Termination
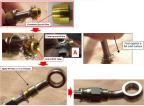
7. Grasp the hose and push the olive against a flat surface until the PTFE liner contacts the shoulder inside the olive.
8. Apply Tef-Gel® to the threads of the main body of the fitting.
9. Insert nipple end of the main body of the fitting into the brake hose.
10. Tighten the socket onto the fitting by hand while pushing the hose towards the fitting.
11. If using a banjo fitting, clamp the bango end in a vise, using wood or plastic jaw covers to prevent damage to the fitting. For B-nut fittings, use a 1/2 inch wrench to hold the fitting.
12. Use an 11mm wrench to torque the socket to 110 in-lbf, allowing the hose to spin to avoid kinking it.
Verification Method
The procedure is complete when all steps are done.
Parent topic