Horizontal Tail Removal
100259-00
Instructions for removing the Horizontal Tail.
Applicable Aircraft Serial Numbers
All
Type of Maintenance
Line
Level of Certification
LSA-RM
Task Specific Training Required
No
Special Tools Required
None
Parts Required
None
Aircraft System and Number
09—Horizontal Tail
Safety Equipment
As Needed
Consumables
None
Must complete air rudder removal and elevator pushrod removal in order before completing the horizontal tail removal. (Air Rudder
Removal)(Elevator
Pushrod Removal)
Task Instructions
1. Prepare a way to support the horizontal tail just above the vertical tail once the two are separated. This can be with padded scaffolding, ladders, or with two helpers.
2. Remove the forward surface plug at the top right side of the vertical tail tip.
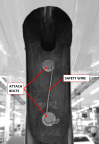
3. Remove the safety wire from the heads of the aft vertical tail/horizontal tail attach bolts.
Figure 195. Safety Wire
4. At the forward vertical tail/horizontal tail attach, accessed through the forward access hole on the right side of the vertical tail tip, remove the AN4C10A bolt and NAS1149C0432. The bolt threads into a nutplate.
5. Remove the two AN4CH10A drilled-head bolts and NAS1149C0432 washers from the aft vertical tail/horizontal tail joint. These bolts thread into nutplates in the vertical tail spar.
CAUTION:
The horizontal tail will not be attached at this point.
6. Carefully raise the horizontal tail a few inches above the vertical tail, feeding the two wire harnesses through the vertical tail tip rib to gain slack. Support the horizontal tail in the position.
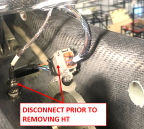
7. Disconnect the multi-pin wire connector and coaxial cable connectors at the vertical tail/horizontal tail joint.
Figure 196. Multi-Pin Wire Connector and Coaxial Cable Connectors
8. Remove the horizontal tail.
Verification Method
Once horizontal tail is completely detached from the aircraft, this task is complete.
Parent topic