Install Aileron
100326-00
Use the following to install either the LH or RH aileron.
Applicable Aircraft Serial Numbers
All
Type of Maintenance
Line
Level of Certification
LSA-RM
Task Specific Training Required
No
Special Tools Required
None
Parts Required
2 X ICA008887 (BUSHING CRES, .190 X .250 X .340)
2 X AN3C16A (BOLT, MACH, CRES, 10-32 X 1.781, 1.375)
2 X NAS1149C0316R (WASHER, FLAT, CRES, .188 X .016, PSVT)
2 X 95630A242 (WASHER, FLAT .250 X .500 X.067 PTFE LOW-FRICTION)
2 X ICA008886 (SPACER, AILERON HINGE, INBD)
2 X NAS1149C0332R (WASHER, FLAT, CRES, .203 X .032, PSVT)
2 (AN3C13A (BOLT, MACH, 10-32, CRES, 1.406, 1.000)
6, as needed MS24665-151 (PIN COTTER, CRES, .063 X .500)
6, as needed M81934/2-04C008 (BEARING, SLEEVE, FLGD, SLFLBR, CRES, .250 X .250) 3 each on LH/RH aileron
2, as needed ICA007808 (HINGE, AILERON, INBD) one on each side of the LH/RH aileron
1, as needed ICA007809 (HINGE, AILERON, CTR-RH)
1, as needed ICA007810 (HINGE, AILERON, OUTBD-RH)
1, as needed ICA007812 (HINGE, AILERON, CTR-LH)
1, as needed ICA007813 (HINGE, AILERON, OUTBD-LH)
6 X AN3C5A (BOLT, MACH, CRES, 10-32 X .250)
8 X NAS1149C0332R (WASHER, FLAT, CRES, .203 X .032, PSVT)
2 X AN3C6A (BOLT, MACH, CRES, 10-32 X .375)
4 X NAS1149C0363R (WASHER, FLAT, CRES, .188 X .063, PSVT)
Aircraft System and Number
14—Wing
Safety Equipment
As Needed
Consumables
TT-I-735A, or equivalent (ISOPROPYL ALCOHOL)
ICA012078 (LUBRICANT, GENERAL PURPOSE)
LOCTITE 603 (REACTING COMPOUND)
LOCTITE 7471 (ACTIVATOR)
Torque Stripe
Task Instructions
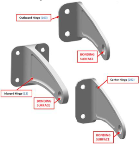
1. Clean bonding surfaces on each aileron hinge with isopropyl alcohol and let it dry.
a. 1 x bonding location on each aileron hinge.
b. Outer surface of 3 x bushings.
Figure 451. Hinges Bonding Surfaces
Note:
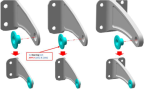
Take care not to bend aileron hinges when pressing in bearings. 3 x aileron hinges are serialized parts.
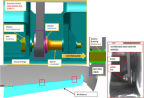
2. Install 3 x bearing (M81934/2-04C008) in each aileron hinge, orient as shown in Figure 452. Bond using Loctite 603 retaining compound with Loctite 7471 activator, let cure manufacturer’s instructions.
Figure 452. Bearing Install in Hinges
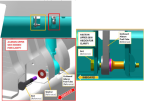
3. Apply general purpose lubricant and install outboard aileron hinge using 2 x bolts (AN3C5A) and 2 x washers (NA1149C0332R). Figure 453
Figure 453. Inboard, Outboard, Center Aileron Hinges
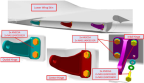
4. Apply general purpose lubricant and install center aileron hinge using 2 x bolts (AN3C5A) and 2 x washers (NAS1149C033R). Figure 453
5. Apply general purpose lubricant and install inboard aileron hinge using 2 x bolts (AN3C5A) and 2 x washers (NAS1149C0363R) on the outboard side and 2 x bolts (AN3C6A) and 2 x washers (NAS1149C0332R) stacked with 2x washers (NAS11490363R) on the inboard side. Figure 453
6. Torque 3 x bolts to 26 in-lbs, apply torque stripe.
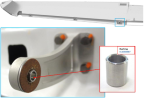
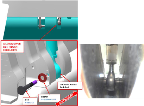
7. Insert bushing into bearing on inboard aileron hinge.
Figure 454. RH Aileron Inboard Hinge, LH Similar
8. Install aileron onto hinges by sliding hinge pins (on aileron) into bearings in center and outboard aileron hinges.
Figure 455. RH Aileron Hinges, LH Similar
10. Ensure aileron bushings stays in aileron hinge.
11. Temporarily attach outboard aileron push tube to RH or LH aileron with bolt and washer.
12. Check for interference between the outboard aileron push tube and the aileron, and between the outboard aileron push tube and the 2x openings in the wing skin and wing spar that the push tube passes through.
Figure 456. Connect Outboard Aileron Push Tube and Aileron, RH Shown, LH Similar
13. Torque the bolts to 26 in-lbs. Apply torque stripe.
Figure 457. Finalize Install, RH Shown, LH Similar
Verification Method
Conduct a function check of aileron system through all aileron positions, primary and secondary stops.
Parent topic