Install Isolation Strip on Fuel Tank Support
100351-00
Use the following procedure to install isolation strips on the fuel tank support if they have become disbonded.
Applicable Aircraft Serial Numbers
00021+
Type of Maintenance
Line
Level of Certification
LSA-RM
Task Specific Training Required
No
Special Tools Required
None
Parts Required
28.8” 70006738424 (3M VHB TAPE 5915WF WHITE, 1/2 IN X 72 YD 16 MIL)
33.5” 70006738424 (3M VHB TAPE 5915WF WHITE, 1/2 IN X 72 YD 16 MIL)
28.8” ICA011790 (STRIP, ISOLATION, 2 X .125, 50 DURO)
33.5” ICA011790 (STRIP, ISOLATION, 2 X .125, 50 DURO)
Aircraft System and Number
07—Fuel System
Safety Equipment
As Needed
Consumables
TT-I-735A or equivalent (ISOPROPYL ALCOHOL)
O-A-51 (ACETONE)
AC-111 (ADHESION PROMOTER)
TALCUM POWDER
As Required
TT-M-261 or equivalent (METHYL ETHYL KETONE [MET])
HYSOL, EA 9394 (STRUCTURAL BONDING ADHESIVE, ROOM TEMPERATURE CURE)
HYSOL, EA 9396 (LAMINATING RESIN, ROOM TEMPERATURE CURE)
POWDER-FREE NITRILE OR LATEX GLOVES
LOCTITE 243 (THREADLOCKER, PRIMERLESS, OIL TOL, REMOVABLE MED STR, BLUE)
ICA012078 (LUBRICANT, GENERAL PURPOSE)
ICA011740 (TORQUE SEAL)
ULTRA FINE POINT SHARPIE
Task Instructions
2. Clean the damaged area as required in accordance with ICA010822, Section 11.1 and/or 11.2.
3. Cut a 28.80” ± .125” piece of isolation strip and a 28.80” ± .125” piece of VHB tape. These two pieces will be for the LH fuel tank support bracket.
4. Apply adhesion promoter to the cleaned mating surfaces. Allow to dry completely.
Figure 155. Prep for Isolation Strip Install
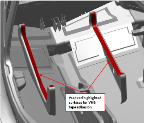
Figure 156. Isolation Strip Installation
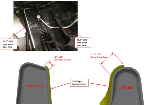
Figure 157. Isolation Strip Installation
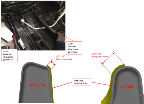
6. Center the isolation strips to within .50” of the center of the support brackets.
7. Use the given measurement to help locate the ends of the isolation strips on the support bracket.
8. Join isolation strip to mating surface using approximately 10-15 psi of pressure.
9. Apply a continuous coating of talcum power to all surfaces of isolation strip that come in contact with the fuel tank.
Verification Method
Inspect the repair to ensure it meets the requirements stated within this procedure.
Parent topic