Remove Roll Cables
100525-00
Use the following task to remove any upper or lower control cables that fall outside of the acceptable conditions.
Applicable Aircraft Serial Numbers
All
Type of Maintenance
Line
Level of Certification
LSA-RM
Task Specific Training Required
No
Special Tools Required
None
Parts Required
None
Aircraft System and Number
06—Flight Controls
Safety Equipment
As Needed
Consumables
None
Task Instructions
2. Remove seat backs and seat pans. (Remove Seat Back)(Seat Pan Removal) Retain all fastening hardware.
6. De-tension the affected lower flight control cable by removing the safety wire or turnbuckle clips and loosen the turnbuckle located at the torque tube entrance shown in Figure 99 below.
Figure 99. Roll Control System Overview
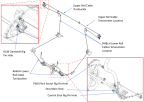
7. Disconnect the lower roll cable at the roll socket and at the turnbuckle at the stick. Ensure that cable is held while disconnecting the turnbuckle.
Figure 100. Roll Socket and Torque Tube Connection Points
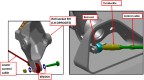
8. There are two methods to remove the cable from the aircraft, either are acceptable:
a. Remove the three pully pivot bolts
b. Remove the two safety pins on each pully bracket.
9. Remove the worn lower roll cable from the aircraft.
Figure 101. Location of Upper Roll Cable Turnbuckle
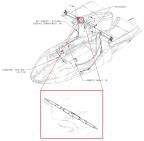
To Remove Upper Roll Cables:
10. De-tension the upper roll cables by removing the safety pins from the turn buckle.
11. Disconnect the upper roll cable at the roll socket and the turnbuckle. Ensure that the cable is held while disconnecting the turnbuckle.
12. Carefully slide the two parts of the old cable out of the aircraft.
Verification Method
Damaged cables have been successfully removed and aircraft is ready for installation of replacement roll cable(s).
Parent topic