Remove Fine Fuel Filter
100502-00
Use the following instruction to remove the fine fuel filter.
Applicable Aircraft Serial Numbers
All
Type of Maintenance
Line
Level of Certification
LSA-RM
Task Specific Training Required
No
Special Tools Required
None
Parts Required
None
Aircraft System and Number
07—Fuel System
Safety Equipment
As Needed
Consumables
None
Task Instructions
2. Close the fuel shutoff valve.
3. Have a rag or container available to contain any fuel that leaks from the fuel lines and filter.
4. Use a 13/16 wrench to hold the union fitting at the fuel pressure relief block while loosening the adjacent -6 AN B-nut with an 11/16 wrench shown in Figure 172. Catch the fuel as it leaks from the joint.
Figure 172. Fine Fuel Filter Assembly
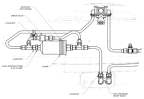
5. Use a 15/16 wrench to hold the check valve while loosening the adjacent -6 AN B-nut with an 11/16 wrench in Figure 172.
6. Use a 1/4 wrench to remove the #10-32 nut holding the fuel filter clamp and remove the clamp.
7. At the fuel filter inlet, loosen the -6 AN B-nut with an 11/16 wrench while holding the 14mm adapter fitting with a 3/4 wrench.
8. Remove the fuel filter and attached plumbing and place on a clean work surface.
9. Wipe away or clean any fuel which may have dripped inside the cabin.
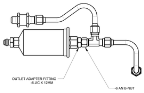
10. At the fuel filter outlet, loosen the -6 AN B-nut with an 11/16 wrench while holding the 12mm adapter fitting with a 3/4 wrench. Figure 173
Figure 173. Fine Fuel Filter and Attached Plumbing
11. Use two 3/4 wrenches to remove the inlet adapter fitting from the old filter. Discard the 14mm washer. Figure 174
Figure 174. Fine Fuel Filter Exploded View Looking AFT
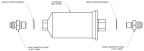
12. Use 7/8 and 3/4 wrenches to remove the outlet adapter fitting from the filter. Discard the 12mm washer.
Verification Method
Task is completed when the fine fuel filter has been removed.
Parent topic